
Tutorial: build a blog
What you'll learn
Build a small blog from an empty project to production: content model, admin, pages, drafts, live preview, SEO and deployment. It takes about 30 minutes. Pick Nuxt or Next.js in the code tabs; everything else is the same.
Before this page: nothing. You need Node.js 22.12 or newer.
1. Create the project
npx nuxi@latest init my-blog
cd my-blog
npx create-easy-cms --db sqlite --yesnpx create-next-app@latest my-blog --ts --app --no-src-dir
cd my-blog
npx create-easy-cms --db sqlite --yescreate-easy-cms installs the packages, writes easy-cms.config.ts, puts a random EASY_CMS_SECRET in .env and connects the admin and the API to your app. SQLite keeps everything in one file (cms.db), which is all you need until you deploy.
2. Describe the content
Replace easy-cms.config.ts with a blog: categories, and posts with drafts and history.
import { defineConfig } from '@easy-cms/core'
import { sqlite } from '@easy-cms/db-sqlite'

export default defineConfig({
  secret: process.env.EASY_CMS_SECRET ?? '',
  db: sqlite({ url: process.env.DATABASE_URL ?? 'file:./cms.db' }),
  admin: { menu: ['posts', 'categories', 'media'] },
  collections: [
    {
      slug: 'categories',
      editIn: 'drawer', // small: edit in a panel over the list
      useAsTitle: 'name',
      access: { read: () => true },
      fields: [
        { name: 'name', type: 'text', required: true },
        { name: 'slug', type: 'slug', from: 'name' },
      ],
    },
    {
      slug: 'posts',
      drafts: true, // draft / published
      versions: true, // history and restore
      useAsTitle: 'title',
      access: {
        // Visitors see published posts; logged-in editors see drafts too.
        read: ({ user }) => (user ? true : { status: { equals: 'published' } }),
      },
      fields: [
        { name: 'title', type: 'text', required: true, maxLength: 120 },
        { name: 'slug', type: 'slug', from: 'title' },
        { name: 'excerpt', type: 'textarea', maxLength: 300 },
        { name: 'cover', type: 'upload' },
        { name: 'body', type: 'richText' },
        { name: 'category', type: 'relationship', to: 'categories', position: 'sidebar' },
        { name: 'publishedAt', type: 'date', position: 'sidebar' },
      ],
    },
  ],
})
In development the database follows the config: save the file and the tables change.
3. Open the admin
npm run devpnpm devyarn devbun run devGo to http://localhost:3000/admin. There are no users yet, so the admin asks for the first admin account. Then you land on the dashboard.
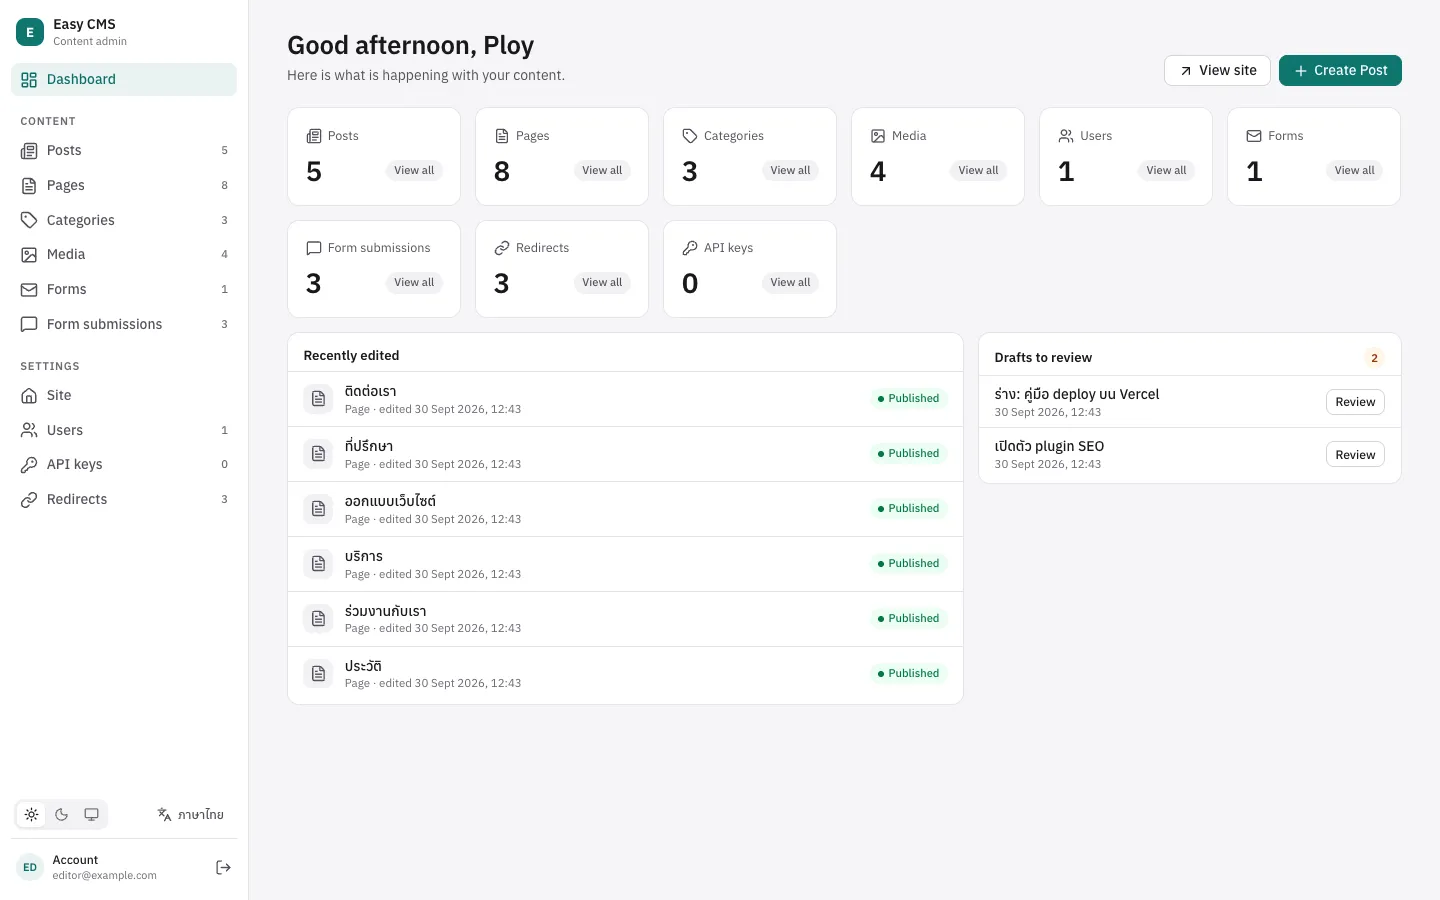
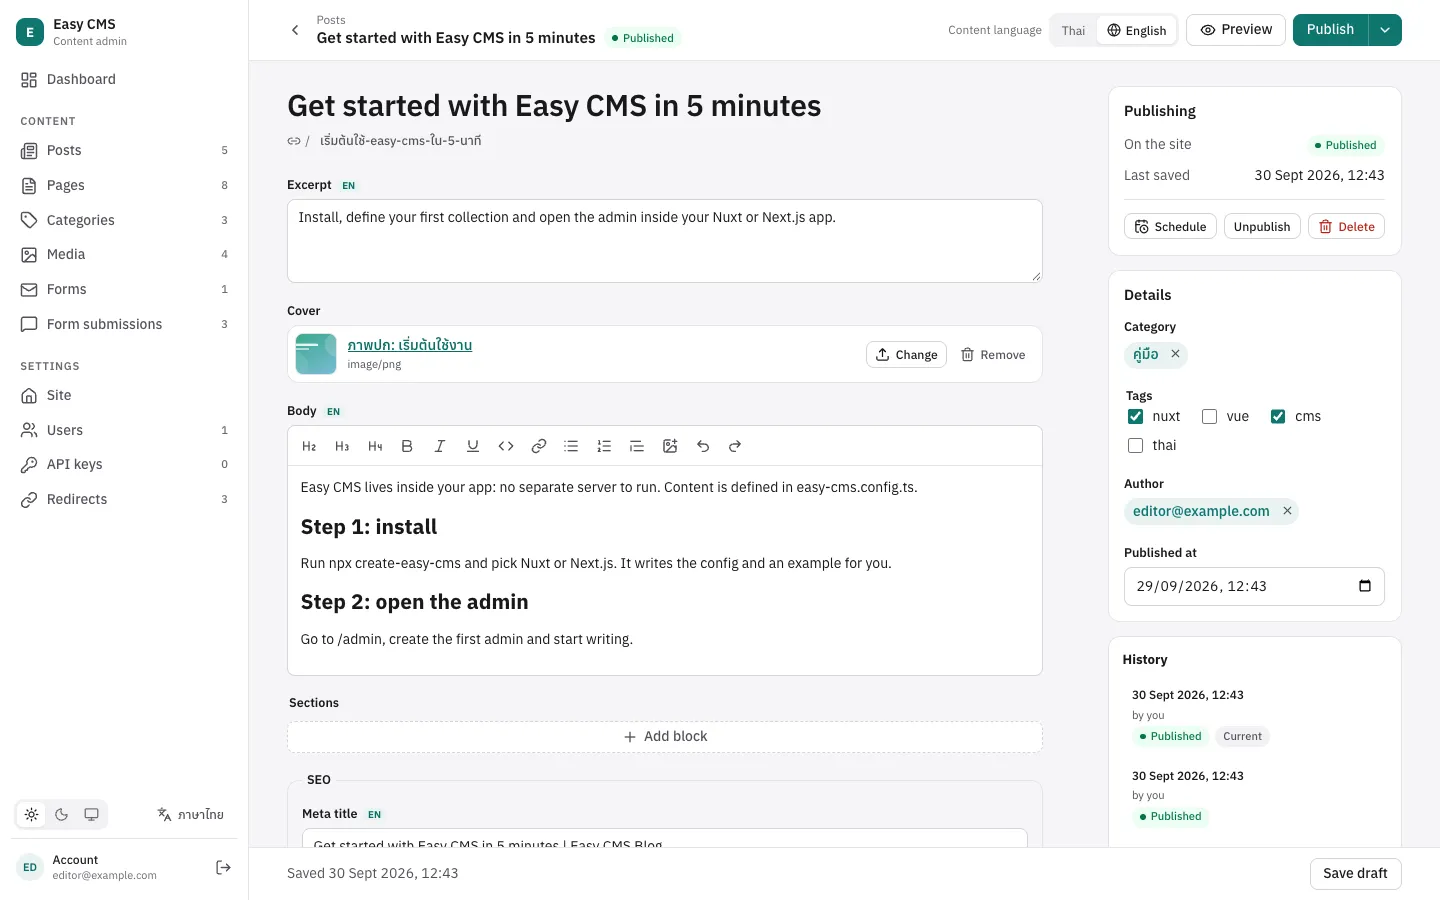
Create a category or two (they open in a panel), then a post: write a title (the slug fills in by itself), an excerpt, some body text, pick a cover and a category, and press Publish.
4. List the posts
export default defineEventHandler(async () => {
  const cms = await useEasyCMS()
  const { docs } = await cms.find('posts', { sort: '-publishedAt', limit: 20 })
  return docs
})import { getEasyCMS } from '@easy-cms/next'
import Link from 'next/link'
import config from '@/easy-cms.config'
export const dynamic = 'force-dynamic'
export default async function Home() {
const cms = await getEasyCMS(config)
const { docs } = await cms.find('posts', { sort: '-publishedAt', limit: 20 })
return (
<ul>
{docs.map((post) => (
<li key={post.id}>
<Link href={`/posts/${post.slug}`}>{post.title}</Link>
</li>
))}
</ul>
)
}For Nuxt, show them in app/pages/index.vue:
<script setup lang="ts">
const { data: posts } = await useFetch('/api/posts')
</script>

<template>
  <ul>
    <li v-for="post in posts" :key="post.id">
      <NuxtLink :to="`/posts/${post.slug}`">{{ post.title }}</NuxtLink>
    </li>
  </ul>
</template>
find returns published posts only, and post.title is typed as string straight from the config: try misspelling it.
5. Show one post
Install the rich text renderer:
npm install @easy-cms/richtextpnpm add @easy-cms/richtextyarn add @easy-cms/richtextbun add @easy-cms/richtextexport default defineEventHandler(async (event) => {
const cms = await useEasyCMS()
const user = await useEasyCMSUser(event)
const { docs } = await cms.find('posts', {
where: { slug: { equals: getRouterParam(event, 'slug') } },
limit: 1,
user, // editors see drafts, visitors only published posts
overrideAccess: false,
draft: user !== null,
})
if (!docs[0]) throw createError({ statusCode: 404 })
return docs[0]
})import { getEasyCMS, getEasyCMSUser } from '@easy-cms/next'
import { renderRichText } from '@easy-cms/richtext'
import { notFound } from 'next/navigation'
import config from '@/easy-cms.config'
export const dynamic = 'force-dynamic'
export default async function PostPage({ params }: { params: Promise<{ slug: string }> }) {
const { slug } = await params
const cms = await getEasyCMS(config)
const user = await getEasyCMSUser(config)
const { docs } = await cms.find('posts', {
where: { slug: { equals: decodeURIComponent(slug) } },
limit: 1,
user, // editors see drafts, visitors only published posts
overrideAccess: false,
draft: user !== null,
})
const post = docs[0]
if (!post) notFound()
return (
<article>
<h1>{post.title}</h1>
<div dangerouslySetInnerHTML={{ __html: renderRichText(post.body) }} />
</article>
)
}For Nuxt, the page app/pages/posts/[slug].vue:
<script setup lang="ts">
import { renderRichText } from '@easy-cms/richtext'

const route = useRoute()
const { data: post } = await useFetch(`/api/posts/${route.params.slug}`, {
  headers: useRequestHeaders(['cookie']), // so editors see their drafts
})
const html = computed(() => renderRichText(post.value?.body))
</script>

<template>
  <article v-if="post">
    <h1>{{ post.title }}</h1>
    <div v-html="html" />
  </article>
</template>
renderRichText escapes everything, so its HTML is safe to insert.
6. Drafts and history
Open your post, change the title and press Save draft. The site still shows the published version; the admin marks the post as having unpublished changes. Press Publish when ready. Every save is kept in History on the right: open an older version and restore it.
Want it live at 9:00 tomorrow? Add schedule: true to the posts collection, and use Schedule next to Publish. See Drafts, versions & scheduling.
7. Live preview
Tell Easy CMS where a post is shown, and let the page follow the form:
// in the posts collection
preview: ({ doc }) => (doc.slug ? `/posts/${doc.slug}` : null),<script setup lang="ts">
// …after useFetch
useLivePreview(post) // auto-imported
</script>'use client'
import { useLivePreview } from '@easy-cms/next/live-preview'
// Render the post here, and use <PostView post={post} /> in the page.
export function PostView({ post: initial }: { post: { title: string } }) {
const post = useLivePreview(initial)
return <h1>{post.title}</h1>
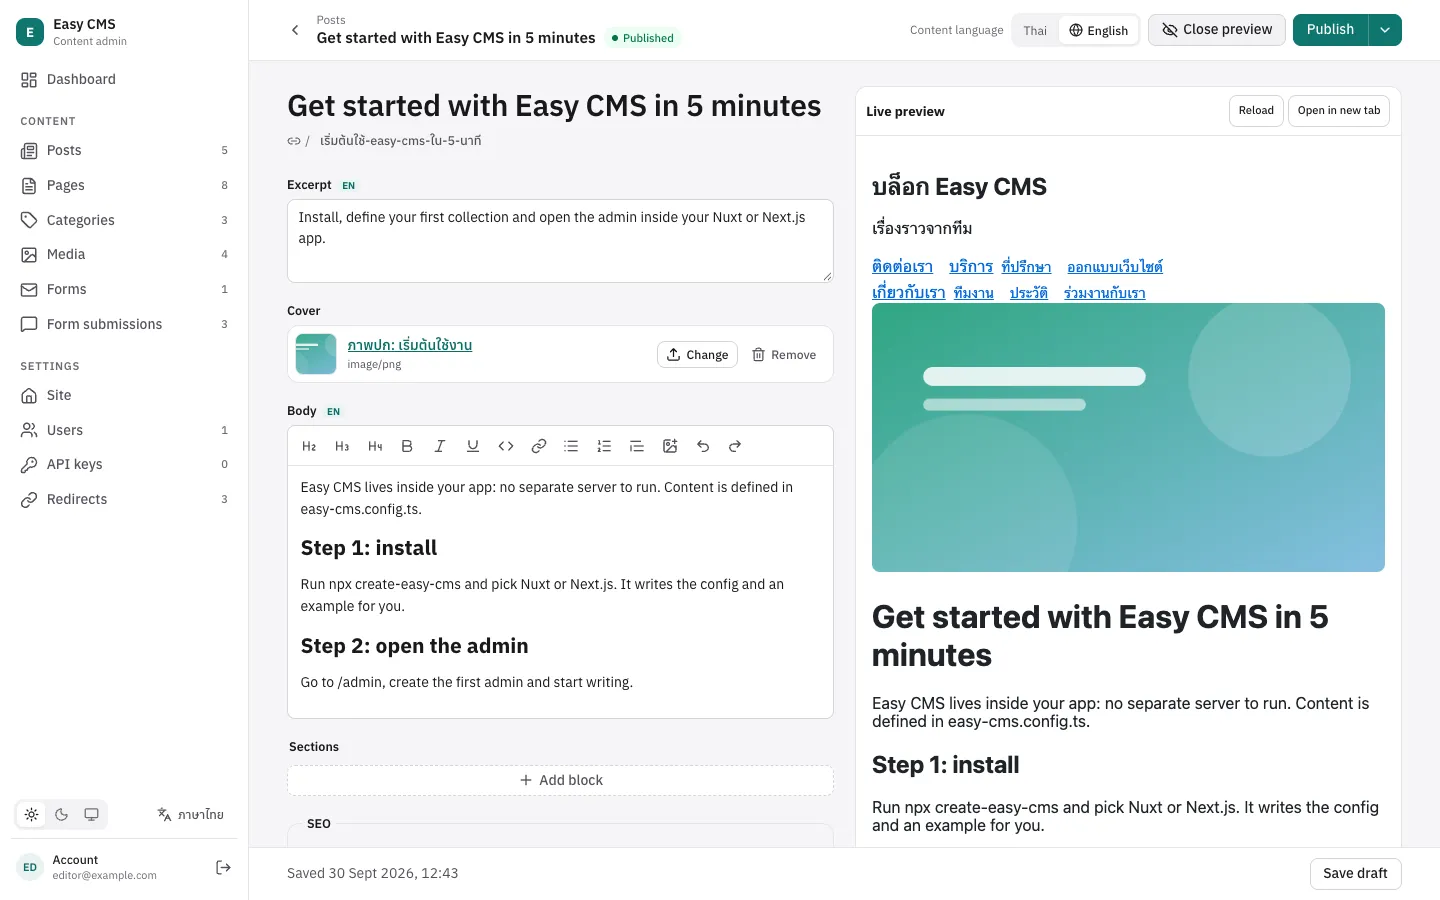
}Press Preview in the editor: the real page appears next to the form and changes as you type.
8. SEO
npm install @easy-cms/plugin-seopnpm add @easy-cms/plugin-seoyarn add @easy-cms/plugin-seobun add @easy-cms/plugin-seoimport { seoPlugin } from '@easy-cms/plugin-seo'
export default defineConfig({
// …
plugins: [
seoPlugin({
collections: ['posts'],
generateTitle: ({ doc }) => `${doc.title} | My Blog`,
generateDescription: ({ doc }) => doc.excerpt as string,
}),
],
})Posts now have an SEO group with length meters, a search preview and Generate buttons. Use seoMeta(post) in the post page for the <title>, description and share tags; see SEO.
9. Deploy
Create the first migration. Production never changes the database on its own:
bashnpx easy-cms migrate:create init git add easy-cms/migrations && git commit -m "CMS schema"bashpnpm exec easy-cms migrate:create init git add easy-cms/migrations && git commit -m "CMS schema"bashyarn easy-cms migrate:create init git add easy-cms/migrations && git commit -m "CMS schema"bashbunx easy-cms migrate:create init git add easy-cms/migrations && git commit -m "CMS schema"Pick a database. SQLite works on a server with a persistent disk. On serverless platforms, switch to Postgres:
npm install @easy-cms/db-postgresanddb: postgres({ url: process.env.DATABASE_URL }). See Databases.Set the environment on the server:
EASY_CMS_SECRET(a new random value, not the one from your laptop),DATABASE_URL, andNODE_ENV=production.Migrate, then start, on every deploy:
bashnpx easy-cms migrate npm run build && npm startbashpnpm exec easy-cms migrate pnpm build && pnpm startbashyarn easy-cms migrate yarn build && yarn startbashbunx easy-cms migrate bun run build && bun run startStore uploads safely. Files go to
uploads/by default; on serverless or several servers, use S3 or Cloudflare R2 (see Uploads).
Go through the checklist before going live, and set up backups.
Next steps
- Recipes: short answers for common tasks.
- Access control: authors who edit only their own posts.
- Localization: the blog in Thai and English.